Python Christmas Tree #
Turtle graphics is a library in Python which can be used for drawing! You can imagine the turtle as a pen that you can move around the screen and draw with.
To start, we need to load the library using import:
import turtle
Setting Up the Screen #
We need to set up the width and height of the screen to draw on. We can save these values as a variable so that it is easy to understand your code
What is a variable?
A variable is a way to store information in a computer program. You can imagine it as a box with a label on it. The box stores something, and you refer to it by name on the label.
In the below example, the label is
width, and the contents is500.
width = 500
height = 500
Now we know the width and height, let’s create the screen.
We will store the screen in the variable s, so we can set the width, height and title.
s = turtle.Screen()
To setup the screen, we can use the s.setup() function.
What is a function?
A function calls a piece of code written somewhere else. You can pass values inside brackets called parameters, which the code can use.
Certain variables, like your screen
s, have functions written by other people that we can use. To use them, add a dot (.) after the variable, like below:
s.setup(width, height)
We can also add a title to your window!
s.title("Christmas Tree!")
When you run your program, you should see a window on your screen.
Now lets create a turtle to draw with!
t = turtle.Pen()
We can set the speed of the turtle of a value between 1 and 10. 1 is the slowest, 10 is the fastest
t.speed(2)
Finally, to keep the window open, we will need to call a function call done from the turtle library.
Note: Python will execute your code from top to bottom, so keep this line at the bottom of your file so that it is the last thing to run!
turtle.done()
Great! We’re ready to draw
So far, your code should look like this:
import turtle

# Set up screen
width = 500
height = 500
s = turtle.Screen()
s.setup(width, height)
s.title("Christmas Tree!")

# Create turtle
t = turtle.Pen()
t.speed(2)

# Keep the window open
turtle.done()
Top of the Tree #
Let’s start with the top of your christmas tree!
Note: As you write your code, you can run it to see how the drawing is going!
Turtle works with coordinates (if you don’t know what coordinates are, ask a mentor).
The middle of the screen is the origin, (0,0).
So we will want to move your turtle higher up the screen by increasing the y direction.
First, lift up the turtle. This allows us to move it without drawing.
t.up()
Now move the turtle:
t.setposition(-60,100)
and put the turtle back down so we can draw:
t.down()
We want to fill (or paint) your drawing with green, so we set the fill colour to green.
Note: We use the American spelling
colorinstead ofcolourwith turtle.
t.fillcolor('green')
t.begin_fill()
To draw a line, we can use forward on your turtle.
t.forward(120)
we can then rotate the turtle anti-clockwise using left.
We have
, and drawn another line.
t.left(130)
t.forward(95)
Do the same again to complete the triangle.
t.left(100)
t.forward(95)
and finally, fill in the top of the tree!
t.end_fill()
Overall, your top section code should look like this:
...
# Top tree section
t.up()
t.setposition(-60, 100)
t.down()
t.fillcolor('green')
t.begin_fill()
t.forward(120)
t.left(130)
t.forward(95)
t.left(100)
t.forward(95)
t.end_fill()

turtle.done()
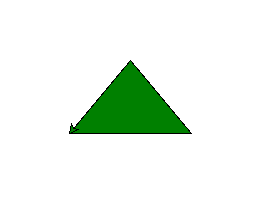
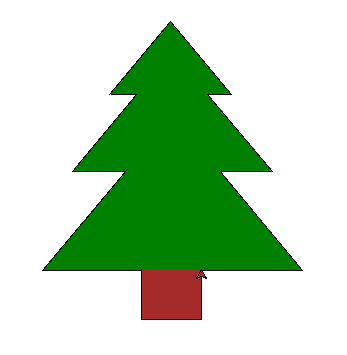
and your tree should look like this:
Middle of the Tree #
For the middle section, we first need to move the turtle to the right of where it finished.
We can do this by changing the x coordinate.
The y coordinate will stay the same, so the turtle is in the same position vertically).
t.up()
t.setx(-35)
t.down()
Writing out forward and left is slow, isn’t it?
We can instead use fd and lt - functions that do the same as forward and left with shorter names!
Let’s now create a polygon for the middle of your tree:
t.begin_fill()
t.fd(100)       # The same as t.forward(100)
t.lt(130)       # The same as t.forward(130)
t.fd(200)
t.lt(130)
t.fd(100)
t.end_fill()
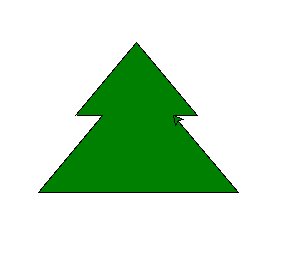

turtle.done()
Great! Your tree should now look like this:
And your code should look like this:
...
# Middle tree section
t.up()
t.setx(-35)
t.down()
t.begin_fill()
t.fd(100)
t.lt(130)
t.fd(200)
t.lt(130)
t.fd(100)
t.end_fill()

turtle.done()
Bottom of the Tree #
We’re almost done with the leaves of your tree!
Write the following code to draw the final section:
## Bottom section
t.up()
t.setposition(-45,24)
t.down()
t.begin_fill()
t.lt(100)
t.fd(130)
t.lt(130)
t.fd(260)
t.lt(130)
t.fd(130)
t.end_fill()
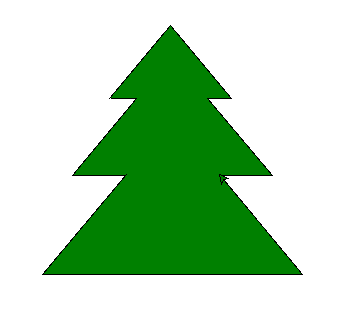
Your tree should now look like this:
Adding a Trunk #
Lets add a trunk to your tree.
We will need to change the fill colour we’re using to 'brown' instead of green!
# Trunk
t.up()
t.setposition(-30,-75)
t.down()
t.fillcolor('brown')
t.begin_fill()
t.lt(140)
t.fd(50)
t.lt(90)
t.fd(60)
t.lt(90)
t.fd(50)
t.end_fill()
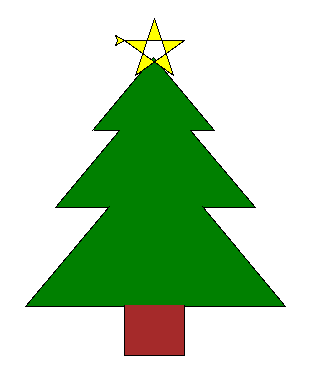
Your drawing should now look like a tree!
Adding a Star #
Your Christmas tree won’t look very good without decorations!
We need to:
- Move to the top of the tree.
- Set the colour to yellow.
- Draw the star.
The first 2 parts are similar to what you have done before
t.up()
t.setposition(-30,190)
t.fillcolor('yellow')
t.begin_fill()
You can start drawing a horizontal line. Up is 0 degrees, so right will be 90 degrees clockwise.
t.rt(90)                # The same as t.right(90)
t.down()
We then want to draw a line, rotate a number of degrees, draw another line, and so on until your star is complete.
As we want to run the same commands repeatedly, we can use something called a loop.
A for loop will let us run a number of times.
In Python, a for loop looks like this:
for i in range(5):
    t.fd(60)
    t.rt(144)
Why is there spaces on the left?:
In Python, whitespace (tabs and space) have a meaning! The contents of the loop will be indented to the right. When the loop is finished, we remove the space and go back to the left.
The above code will execute 5 times because range(5) will generate a list of 5 numbers (0 to 4).
The number of times we have gone through the loop is stored in the variable i, but for this code we do not need to access it.
We can now complete your star!
t.end_fill()
Your tree should now have a star on the top!
Your code should look like this:
...
# Star on the top
t.up()
t.setposition(-30,190)
t.fillcolor('yellow')
t.begin_fill()
t.rt(90)
t.down()
for i in range(5):
    t.fd(60)
    t.rt(144)
t.end_fill()

turtle.done()
Adding Baubles #
Let’s add some baubles to your tree!
To do this:
- Move the turtle to where you want to draw a bauble (don’t forget to lift the turtle up and down!)
- Use the
t.dot(size, color)function to draw a bauble
For example:
t.up()
t.setposition(-55, 100)
t.down()
t.dot(20, 'blue')
Feel free to add as many as you like!
When you’re finished, you can hide the turtle using the hideturtle function.
t.hideturtle()
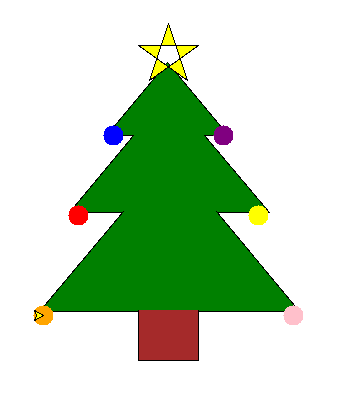
Your tree should now look something like this:
And your code should look like this:
...
# Baubles
t.up()
t.setposition(-55, 100)
t.down()
t.dot(20, 'blue')
...

turtle.done()
Adding Flashing Lights #
Your tree is starting to look great! It would look even better with some flashing lights
The easiest way to do this is to create more turtles. Lets add 3, for example:
light1 = turtle.Pen()
light2 = turtle.Pen()
light3 = turtle.Pen()
Move your turtles to the positions you want them in.
light1.up()
light1.setposition(0,-20)
light1.down()
light1.hideturtle()
When all of your turtles are in position, we can use another loop to make them flash!
This time, we will use a while loop.
A while loop checks a condition before executing the code inside.
If the condition is True, the code will run.
If the conditions is False, the code will not run.
When the code inside of the loop is finished, it checks the condition again and runs the code.
In our case, we want to loop forever, so we can set our condition as True
while True:
    ...
To make our turtle change colours, we need to make a list of colours to use.
Lists in Python use square brackets – [ and ].
For example:
colors = ['red', 'yellow', 'blue']
Note: In Python, lists start at 0. So the 0th colour is
'red', the 1st colour is'yellow', and the 2nd colour is'blue'.You can get the colours out of the list, you can use square brackets. E.g.
colors[0]is'red'.
Inside our loop, we want to set the colour of each of our lights:
while True:
    light1.dot(20, colors[0])
    light2.dot(20, colors[1])
    light3.dot(20, colors[2])
At the moment the colours don’t change as we’re always drawing the lights with the same colour.
We can change this by using a counter that increases in value by 1 each time we run our loop. We can divide this value by the number of lights, 3, and use the remainder to pick a colour.
In python, 2 % 3 will give us the remainder of 2 divided by 3, which is 2.
To make sure our lights are different colours, each one can add a value to our counter, like so:
counter = 1
while True:
    light1.dot(20, colors[counter % 3])         # Run 1: colors[1], Run 2: colors[2]
    light2.dot(20, colors[(counter + 1) % 3])   # Run 1: colors[2], Run 2: colors[3]
    light3.dot(20, colors[(counter + 2) % 3])   # Run 1: colors[0], Run 2: colors[1]
    counter = counter + 1                       # Add 1 to the counter
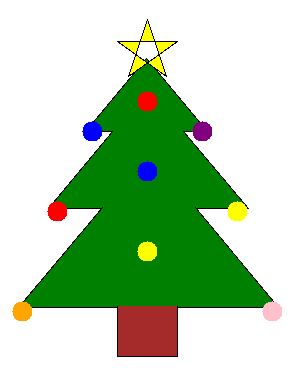
Your tree should now look like this, with flashing lights:
What other decorations can you add?
The complete code can be viewed here